When you're going to practice adventure sports, the first thing you need to be clear about is that in some cases you'll need lessons, as there are techniques that can only be acquired through a short beginner's course. In this case, if you're going skiing, don't hesitate to consult companies in your area.
Once you begin with ski initiation and have got to grips with how the equipment works and how to control it, what you need is to gain confidence and progress gradually. After a few lessons, you'll be ready to advance further.

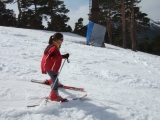
Now is the time to pick up a bit more speed and start feeling like you're really skiing. To do this, you'll need to find a steeper slope by going up part of the mountainside, which will save you the tedious effort of pushing with your poles and allow you to gain enough speed to start gliding. There are two ways to climb the slope: the ladder method and the scissors method.
The Ladder Method
We make parallel openings in a position perpendicular to the natural slope of the mountainside; it's about opening and closing. Starting from a position with parallel skis, we first separate the uphill ski and then the downhill ski joins it, trying to maintain parallelism.
For this, it's very important not to open the tails more than the tips, otherwise we'll end up sliding downhill, whether facing forwards or backwards. We can use the poles, alternating and synchronising the support movements to gain stability and balance.

When climbing a slope with a steep incline or hard snow, we need to ensure our skis grip the snow. To do this, it's essential to use the edges of the skis, digging them firmly into the snow. We just need to bend our knees slightly towards the mountain and feel the edge of our foot securing our step. Otherwise, the skis will tend to slide and seek the slope, failing to find the necessary grip.
Climbing the slope is a very useful exercise; with it we learn to use the edges of our skis and therefore control our stability on the slope while stationary.
The Scissors Method
This involves opening, with your back to the slope, the front part of the skis and closing the tails while trying not to step on them, as we place the poles behind us.
The resulting shape resembles scissors - hence the name. It's important to perform the movements slowly, coordinating each limb. In this case, the edges must be dug inwards to ensure effective grip. The width of the ski opening will be as large as needed.
We ourselves, depending on the pull of the slope, will open a larger or smaller "scissor" shape as the terrain demands. This is a slightly more technical method but faster than the previous one.
It's good to learn to separate the movement of your torso from your legs, coordinating the movements of legs and feet. It won't be your body carrying you from side to side but rather the movements of your limbs.
The Direct Descent and Exercises to Improve Your Balance
The following exercises require a slightly steeper slope, which will allow for increased gliding speed.
The natural position of the skier will be as described previously; again it's important not to lean back and to try to keep your arms away from your body, with a slight bend at the elbow that allows us to keep the poles behind too. It's as if our body travels over our legs, which move simultaneously as one block in the desired direction.
And it's crucial that your body weight is evenly distributed across both feet, avoiding the tendency to rest more on one foot than the other.

The ideal terrain for this exercise is a slope with a flat finish or even a slight uphill that naturally slows you down, without needing additional manoeuvres. You'll learn to brake later - don't worry about this now; if you respect the chosen terrain you won't need to know how to brake.
To begin your first descent, you need to position yourself facing down the valley.
The first step involves planting your poles in front of your skis, tilting the grips towards you to prevent losing control. Then begin opening and closing the tails of your skis, like clock hands but always maintaining the distance between the tips.
It's like turning around them while supporting yourself with the poles. In this way, we move in a circle ensuring the skis and our position face the slope but preventing them from going down prematurely.
Once done, calmly and remembering the position we should adopt, we stop applying pressure on the poles and begin the descent. You might feel an inertia pulling you backwards but it's important to stay firm and not panic. Let the glide end naturally when you lose speed.
It's helpful to repeat these exercises successively to adapt to the new sensation. It's also good to practice now, with slightly more speed, the exercises we did while stationary.

We set off, and during the glide:
- Lift one ski, then the other.
- Take small hops, one after another.
- Turn your body to one side, then the other.
- Do flexions and extensions.
It's very important, once again, to try to distribute your weight equally across both legs. You should feel the same pressure on both feet and check that neither the tips nor tails of the skis are shaking. They shouldn't move uncontrollably but remain steady on the snow. Gradually you'll learn to adopt the right postures that allow you to maintain balance and stability on your skis, achieving greater control over your movements.